Welcome to our blog post all about air suspension kits! Whether you’re looking to improve the performance and ride quality of your vehicle or simply enhance its overall aesthetic, installing an air suspension kit can be a game-changer. In this article, we’ll explore the benefits of these kits, guide you through choosing the right one for your vehicle, provide a step-by-step installation guide, discuss common challenges and safety precautions, and offer maintenance and care tips to keep your air suspension system in top shape. So, let’s dive in and discover how air suspension kits can elevate your driving experience!
Benefits of installing an air suspension kit
Installing an air suspension kit in your vehicle can provide numerous benefits, enhancing not only the performance but also the ride quality. Whether you own a car, truck, or SUV, air suspension can offer a comfortable and smooth driving experience.
One of the main benefits of installing an air suspension kit is the ability to adjust the ride height. With traditional suspension systems, changing the ride height usually involves replacing specific parts or using aftermarket modifications. However, with air suspension, you can easily adjust the ride height with just the touch of a button. This allows you to lower your vehicle for improved aerodynamics or raise it for better ground clearance, depending on your needs.
Another advantage of air suspension kits is the ability to improve load-carrying capacity. Adding air springs to your vehicle’s suspension system can provide extra support when carrying heavy loads, such as luggage, equipment, or towing trailers. By adjusting the air pressure in the air springs, you can ensure a level ride and prevent sagging, which can negatively impact handling and stability.
Furthermore, air suspension kits can drastically improve the overall ride quality. The air springs and dampers work together to absorb shocks and vibrations from the road, resulting in a smoother and more comfortable ride. Potholes, bumps, and rough terrain are no longer a major concern when you have air suspension installed. This can be especially beneficial for those who frequently drive on uneven or challenging road conditions.
- Adjustable ride height for improved aerodynamics and ground clearance
- Enhanced load-carrying capacity, preventing sagging and improving stability
- Improved ride quality, absorbing shocks and vibrations for a smoother drive
| Adjustable ride height |
| Enhanced load-carrying capacity |
| Improved ride quality |
If you are considering upgrading your vehicle’s suspension system, an air suspension kit can offer a range of benefits. From adjustable ride height and improved load-carrying capacity to enhanced ride quality, these kits provide a versatile and comfortable driving experience. Just ensure you choose the right kit for your vehicle’s make and model, and follow the manufacturer’s instructions for installation and maintenance. With air suspension, you can enjoy a smoother ride while also adding a touch of customization to your vehicle.
Choosing the right air suspension kit for your vehicle
When it comes to choosing the right air suspension kit for your vehicle, there are several important factors to consider. Choosing the right kit is crucial for ensuring optimal performance and safety. With so many options available in the market, it can be overwhelming to make the right choice. In this blog post, we will break down the key factors to consider when selecting an air suspension kit for your vehicle.
Compatibility: The first thing you need to determine is whether the air suspension kit is compatible with your vehicle. Different makes and models have varying suspension systems, so it is essential to choose a kit that is designed specifically for your vehicle. This will ensure a proper fit and optimal performance.
Performance Requirements: Consider the specific requirements of your vehicle and how you intend to use it. Are you looking to improve the ride quality, towing capabilities, or load-carrying capacity? Determining your performance needs will help you narrow down the options and choose a kit that meets your requirements.
Budget: Air suspension kits come in a range of prices, so it’s important to establish a budget before making a decision. While it can be tempting to opt for a cheaper option, keep in mind that quality and performance may be compromised. Consider investing in a reputable brand that offers a warranty, as this can save you money in the long run by avoiding potential issues or failures.
Preparation and tools needed for installation
When it comes to installing an air suspension kit in your vehicle, proper preparation and having the right tools are essential for a successful installation. By taking the time to gather all the necessary materials and equipment beforehand, you can ensure that the installation process goes smoothly and efficiently. In this blog post, we will discuss the importance of preparation and the tools needed for installing an air suspension kit.
Preparing for the installation of an air suspension kit involves several key steps. The first step is to thoroughly read the installation instructions provided by the manufacturer. This will give you a better understanding of the process and help you anticipate any challenges that may arise. It is also important to have a clear and organized workspace where you can comfortably work on your vehicle. Clearing any clutter and having adequate lighting will make the installation process much easier.
Now, let’s talk about the tools you’ll need for the installation. While the specific tools required may vary depending on the kit and your vehicle, some common tools include a jack, jack stands, wrenches, sockets, pliers, and a torque wrench. These tools are necessary for removing the existing suspension components and installing the new air suspension kit. Additionally, having a power drill, a set of drill bits, and a measuring tape can be helpful when making any necessary modifications or adjustments.
- Jack and jack stands: These are used to lift and support your vehicle securely.
- Wrenches and sockets: These tools are crucial for loosening and tightening bolts and nuts.
- Pliers: Pliers can come in handy for gripping and manipulating small parts during the installation process.
- Torque wrench: This tool ensures that bolts are tightened to the specified torque, preventing over or under tightening.
- Power drill and drill bits: You may need to make holes or modifications in your vehicle’s frame to accommodate the air suspension kit.
- Measuring tape: This is useful for taking accurate measurements to ensure proper installation.
Having these tools readily available will save you time and frustration during the installation process. It is also important to wear appropriate safety gear, such as gloves and safety glasses, to protect yourself while working on your vehicle.
In conclusion, proper preparation and having the right tools are crucial when installing an air suspension kit. By carefully reading the installation instructions, clearing your workspace, and gathering the necessary tools, you can ensure a successful and smooth installation process. Remember to take your time and follow the instructions closely to achieve optimal results in enhancing your vehicle’s suspension performance and ride quality.
Step-by-step guide for installing an air suspension kit
Installing an air suspension kit can greatly improve the performance and ride quality of your vehicle. However, it is important to ensure that the installation process is done correctly to avoid any issues or complications in the future. In this step-by-step guide, we will walk you through the process of installing an air suspension kit, from beginning to end.
Step 1: Preparation and Tools Needed
Before you begin the installation, it is important to gather all the necessary tools and prepare your workspace. Some of the basic tools you will need include a jack, jack stands, wrenches, sockets, and pliers. Additionally, make sure you have a detailed instruction manual specific to your vehicle and air suspension kit, as this will guide you through the installation process.
Step 2: Removing the Old Suspension
The next step involves removing the old suspension components to make way for the new air suspension kit. Begin by safely raising your vehicle using a jack and securing it with jack stands. Then, depending on your vehicle, you may need to remove the wheels and tires to gain access to the suspension components. Carefully follow the instructions in the manual to remove the old suspension components, which may include struts, shocks, springs, or other relevant parts.
Step 3: Installing the Air Suspension Kit
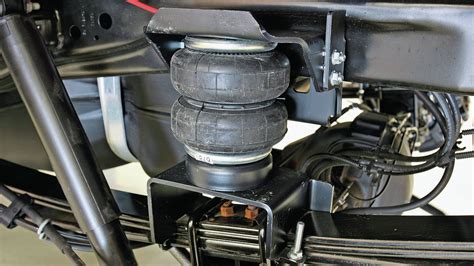
With the old suspension components removed, it is now time to install the air suspension kit. Start by carefully following the instructions provided in the manual to attach the new air springs or airbags to your vehicle’s suspension system. You may need to make adjustments or modifications as instructed to ensure proper fitment.
Step 4: Connecting the Air Lines and Components
Once the air springs or airbags are properly installed, you will need to connect the air lines and other components of the air suspension system. This includes attaching the air lines to the air springs or airbags, as well as connecting them to the air compressor and the air tank. Follow the instructions closely to ensure the proper routing and connection of the air lines.
Step 5: Testing and Adjusting Air Pressure
After all the components are properly connected, it is important to test and adjust the air pressure in the system. Use a pressure gauge to check the pressure and adjust it according to your desired ride height and comfort level. This step is crucial to ensure optimal performance and ride quality.
Step 6: Final Checks and Safety Precautions
Before you lower your vehicle, it is essential to perform final checks and ensure everything is properly secured and tightened. Double-check all connections, fittings, and components to make sure there are no leaks or loose parts. Additionally, make sure to adhere to all safety precautions mentioned in the instruction manual to avoid any accidents or injuries during the installation process.
Following these step-by-step instructions, you can successfully install an air suspension kit on your vehicle. Enjoy the benefits of improved performance, ride quality, and customization options that air suspension provides.
Testing and adjusting air pressure in the system
Testing and adjusting air pressure in the system is an important step in ensuring the optimal performance of your air suspension kit. By properly testing and adjusting the air pressure, you can fine-tune the system to meet your specific needs and preferences. This will ultimately result in a smoother and more comfortable ride.
When it comes to testing the air pressure in your air suspension system, there are a few key tools that you will need. Firstly, you will need a reliable air pressure gauge. This gauge will allow you to accurately measure the air pressure in the system. Additionally, you may also want to consider investing in an air compressor. An air compressor will make it much easier to adjust the air pressure as needed.
Once you have the necessary tools, you can begin testing and adjusting the air pressure. Start by connecting the air pressure gauge to the inflation valve on the air suspension system. This will allow you to read the current air pressure in the system. Compare this reading to the recommended air pressure specified by the manufacturer of your air suspension kit.
| Recommended Air Pressure | Actual Air Pressure |
|---|---|
| 100 PSI | 95 PSI |
| 110 PSI | 105 PSI |
| 120 PSI | 118 PSI |
In the table above, you can see an example of recommended air pressure values and actual air pressure readings. If the actual air pressure is lower than the recommended pressure, you will need to add air to the system using the air compressor. On the other hand, if the actual air pressure is higher, you will need to release air from the system until it reaches the desired level.
It is important to note that testing and adjusting air pressure should be done with caution. Overinflating or underinflating the system can lead to suboptimal performance and even potential damage. Always refer to the instructions provided by the manufacturer of your air suspension kit and follow their guidelines for testing and adjusting air pressure.
Common challenges during air suspension installation
Installing an air suspension kit in your vehicle can greatly enhance its performance and ride quality. However, like any installation process, there can be some common challenges that you may encounter along the way. It’s important to be aware of these challenges and prepare for them to ensure a successful installation. In this blog post, we will discuss some of the common challenges that you may face during the air suspension installation process and provide tips on how to overcome them.
1. Compatibility: One of the first challenges you may encounter during air suspension installation is ensuring compatibility between the kit and your vehicle. It is crucial to choose the right air suspension kit that is specifically designed for your make and model of vehicle. You should carefully research and check the compatibility of the kit before making a purchase. This will help you avoid any compatibility issues and ensure a smooth installation process.
2. Lack of proper tools: Another challenge that you may face is not having the proper tools required for the installation. Installing an air suspension kit usually involves a range of tools such as wrenches, sockets, and jacks. It’s important to have all the necessary tools readily available before you begin the installation process. Make a list of the tools required and ensure you have them on hand to avoid any delays or difficulties during the installation.
3. Wiring and electrical issues: Electrical connections are an important part of an air suspension system. However, dealing with wiring and electrical components can be challenging for some individuals. It is important to carefully follow the provided instructions and diagrams to ensure proper wiring connections. If you are unsure about any electrical aspects, it is recommended to seek professional assistance or guidance to avoid any potential damage to the system or your vehicle.
In conclusion, while installing an air suspension kit can be a rewarding upgrade for your vehicle, it can also come with its fair share of challenges. By being aware of these common challenges such as compatibility issues, lacking proper tools, and wiring and electrical difficulties, you can better prepare yourself for a successful installation. Remember to thoroughly research and choose the right air suspension kit for your vehicle, gather all the necessary tools, and follow the provided instructions carefully. With proper preparation and attention to detail, you can overcome these challenges and enjoy the benefits of a well-installed air suspension kit.
Safety precautions for a successful installation
Air suspension kits are a popular choice for vehicle owners looking to enhance their ride quality and performance. Whether you are a DIY enthusiast or a professional mechanic, it is essential to prioritize safety during the installation process. Taking the necessary precautions can help ensure a successful and accident-free installation. In this blog post, we will discuss some key safety measures that you should consider when installing an air suspension kit.
1. Read the instructions thoroughly: Before diving into the installation process, carefully read and understand the manufacturer’s instructions. Familiarize yourself with the components, tools required, and the step-by-step procedure. It is vital to have a clear understanding of the installation process to avoid any errors.
2. Use appropriate safety equipment: When working with air suspension kits, it is crucial to wear appropriate safety equipment. This includes safety goggles, gloves, and protective clothing. These items will protect you from potential injuries during the installation, especially when handling heavy-duty tools or working underneath the vehicle.
3. Ensure the vehicle is secure: Before starting the installation, it is important to secure the vehicle properly. Use jack stands to support the vehicle and prevent it from rolling or shifting during the installation process. This will provide a stable and safe working environment, reducing the risk of accidents.
4. Disconnect the power source: To avoid any electrical mishaps, disconnect the vehicle’s power source before starting the installation. This will prevent accidental air compressor activation or any electrical shorts that may occur during the installation process.
5. Seek professional help if needed: If you are unsure about any aspect of the installation process or if you lack the necessary tools and expertise, it is always best to seek professional help. A trained mechanic or air suspension specialist will ensure a safe and efficient installation, minimizing the risk of errors or accidents.
By following these safety precautions, you can significantly reduce the chances of accidents or injuries during the installation of an air suspension kit. Remember, safety should always be a top priority, and taking the necessary precautions will result in a successful and hassle-free installation process.
Maintenance and care tips for your air suspension kit
The maintenance and care of your air suspension kit is crucial for ensuring its longevity and optimal performance. By following a few simple tips, you can extend the lifespan of your system and enjoy a smooth and comfortable ride for years to come.
1. Clean and Inspect: Regularly clean your air suspension components to remove dirt, grime, and any corrosive substances that may have accumulated. Use a mild detergent and water solution, and avoid using abrasive cleaners that can damage the surfaces. Inspect your system for any signs of wear or damage, such as leaks, cracks, or loose connections.
2. Check Air Pressure: It’s important to regularly check and maintain the air pressure in your system. Over time, the pressure may decrease due to small leaks or natural loss. Use a pressure gauge to monitor the air pressure in each air spring and make adjustments as needed to ensure proper inflation.
3. Lubricate Moving Parts: Keep the moving parts of your air suspension kit lubricated to prevent friction and ensure smooth operation. Apply a silicone-based lubricant or a lubricant specifically designed for air suspensions to the pivot points, bushings, and other moving components.
4. Inspect Air Lines: Regularly inspect the air lines for any signs of damage or wear. Check for cracks, abrasions, or leaks in the lines and replace them if necessary. Ensure that the connections are tight and secure to avoid any air leakage.
5. Monitor Suspension Height: Pay attention to the suspension height of your vehicle and make sure it remains within the manufacturer’s recommended range. If you notice any abnormalities or inconsistencies in the height, it may indicate a potential issue with your air suspension system that requires attention.
6. Avoid Overloading: Be mindful of the weight capacity of your air suspension kit and avoid overloading your vehicle. Excessive weight can put strain on the system and lead to premature wear and damage. If you regularly carry heavy loads, consider upgrading to a higher capacity kit that can handle the extra weight.
| Benefits of Maintenance and Care for Air Suspension Kits |
|---|
| 1. Prolongs the lifespan of the air suspension system |
| 2. Ensures optimal performance and ride quality |
| 3. Reduces the risk of unexpected breakdowns |
| 4. Saves money on potential costly repairs |
| 5. Enhances safety by preventing system failures |
By following these maintenance and care tips, you can keep your air suspension kit in top condition and enjoy a smooth, comfortable ride. Regular inspections and preventive maintenance will help identify any potential issues before they become major problems. Taking care of your air suspension system will not only extend its lifespan but also ensure your safety on the road.
Enhancing performance and ride quality with air suspension
When it comes to enhancing performance and ride quality, installing an air suspension kit can make a significant difference. Air suspension offers a range of benefits that traditional suspension systems cannot match. By adjusting the air pressure in the system, you can achieve a smoother ride, improved handling, and increased stability.
One of the key benefits of air suspension is its ability to provide adjustable ride height. With the press of a button, you can raise or lower your vehicle to adapt to different road conditions or personal preferences. This feature not only enhances the aesthetic appeal of your vehicle but also improves its performance. By lowering the ride height, you can reduce aerodynamic drag, resulting in improved fuel efficiency and better handling at high speeds.
In addition to adjustable ride height, air suspension also offers load-leveling capabilities. This means that the system automatically adjusts the air pressure in the air springs to maintain a level ride height, regardless of the load in your vehicle. Whether you’re carrying heavy cargo or towing a trailer, air suspension ensures that your vehicle remains stable, reducing the risk of bottoming out or swaying.
Another advantage of air suspension is its ability to provide a smooth and comfortable ride. The air springs absorb shocks and vibrations more effectively than traditional coil or leaf springs, resulting in a smoother and more enjoyable driving experience. This is particularly beneficial if you frequently drive on rough or uneven roads, as air suspension can significantly reduce the impact felt inside the cabin.
- Adjustable ride height
- Load-leveling capabilities
- Smooth and comfortable ride
In terms of maintenance, air suspension systems require regular care to ensure optimal performance. It is important to regularly inspect the air springs, air lines, and air compressor for any signs of wear or damage. Keeping the system clean and free from debris is also essential to prevent clogs or malfunctions. Additionally, it is recommended to check the air pressure in the system periodically and adjust it as needed to maintain the desired ride height and performance.
| Safety Precautions | Common Challenges | Preparation and Tools Needed |
|---|---|---|
| 1. Always follow the manufacturer’s instructions and guidelines during installation. | 1. Ensure all components are properly aligned and installed. | 1. Gather all the necessary tools, such as wrenches, air compressors, and suspension parts. |
| 2. Use proper safety equipment, such as gloves and eye protection, when working with the system. | 2. Be aware of potential issues, such as air leaks or compatibility with your vehicle’s make and model. | 2. Clean the work area and ensure sufficient space to maneuver. |
| 3. If unsure, consult a professional mechanic or installer. | 3. Seek assistance if needed, especially during the installation of more complex systems. | 3. Read the installation instructions thoroughly before starting the process. |
In conclusion, installing an air suspension kit can greatly enhance the performance and ride quality of your vehicle. With adjustable ride height, load-leveling capabilities, and a smoother ride, air suspension offers a superior driving experience. However, it is important to follow safety precautions, be aware of common challenges, and properly prepare for the installation process. With regular maintenance and care, your air suspension kit will continue to provide optimal performance and ride comfort for years to come.
Frequently Asked Questions
1. Why should I install an air suspension kit?
Installing an air suspension kit can provide several benefits, including improved ride quality, adjustable suspension height, enhanced vehicle performance, and increased load-carrying capacity.
2. How do I choose the right air suspension kit for my vehicle?
When selecting an air suspension kit, consider factors such as your vehicle’s make and model, desired ride height adjustability, load capacity requirements, and budget. It is also recommended to consult with experts or refer to the manufacturer’s guidelines for compatibility.
3. What preparation and tools are required for installing an air suspension kit?
Prior to installation, you will need tools such as wrenches, jack stands, a hydraulic jack, pliers, and a torque wrench. It is important to prepare the necessary components, such as the air springs, compressor, control module, and mounting hardware, as well as ensure a clean working area.
4. Can you provide a step-by-step guide for installing an air suspension kit?
While the installation process may vary depending on the specific kit and vehicle, a general guide for installing an air suspension kit includes steps such as removing the existing suspension components, installing the air springs and necessary hardware, connecting the compressor and control module, and testing the system for functionality.
5. How do I test and adjust the air pressure in the system?
To test the air pressure in the system, you can use a pressure gauge specifically designed for air suspension. Adjusting the air pressure typically involves inflating or deflating the air springs according to your desired ride height and load requirements, as specified in the manufacturer’s instructions.
6. What are some common challenges during air suspension installation?
Common challenges during air suspension installation may include difficulties in removing the old suspension components, proper alignment and positioning of the new components, electrical wiring and connections, and air leakage issues. It is important to carefully follow the installation instructions and seek professional assistance if needed.
7. What safety precautions should I take for a successful air suspension installation?
Some safety precautions to follow during air suspension installation include wearing protective gear, ensuring the vehicle is securely supported on jack stands, disconnecting the battery, double-checking all connections, and conducting a thorough inspection and test of the system before driving the vehicle.
